私はReactが好きで、Reactを使ってWebアプリを開発することが多いんですが、これからAngularを書くことになりまして、Angularも覚える必要が出てきました。Angularを勉強するに当たって、やはり公式ドキュメントが大変役に立ちます。その中で「Architecture Overview」のページは、ちゃんと読めばAngularの理解がかなり深まるようになっています。これからAngularを勉強しようと思っている方は、まずこのArchitecture Overviewを読まれることをオススメします。今回日本語に訳してみましたので、ぜひ参考にしてみてください。
目次
Architecture Overview – アーキテクチャ概要
Angular is a framework for building client applications in HTML and either JavaScript or a language like TypeScript that compiles to JavaScript.
AngularはHTMLとJavaScriptまたはJavaScriptにコンパイルするTypeScriptのような言語でクライアントアプリケーションを構築するためのフレームワークです。
The framework consists of several libraries, some of them core and some optional.
フレームワークはコアなものやオプショナルなものなど複数のライブラリから構成されています。
You write Angular applications by composing HTML templates with Angularized markup, writing component classes to manage those templates, adding application logic in services, and boxing components and services in modules.
Angular化されたマークアップでHTMLのtemplateを作り、それらのtemplateを管理するためにcomponentを書き、serviceにアプリケーションのロジックを追加し、moduleにcomponentとserviceを持たせることで、Angularアプリケーションを構築します。
Then you launch the app by bootstrapping the root module. Angular takes over, presenting your application content in a browser and responding to user interactions according to the instructions you’ve provided.
次に、root moduleをbootstrappingすることによってアプリをローンチします。そうすることでAngularは、ブラウザにアプリケーションのコンテンツを表示し、実装した命令に従ってユーザーインタラクションに応答するようになります。
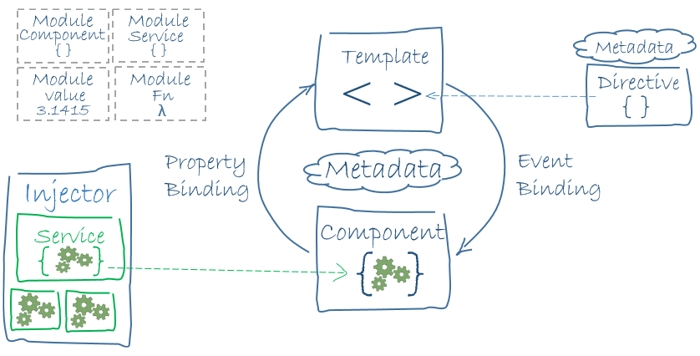
Of course, there is more to it than this. You’ll learn the details in the pages that follow. For now, focus on the big picture.
もちろん、これだけではありません。あなたは、このページを通して詳細を学んでいくことになります。まずは、以下の画像に目を通してください。

The code referenced on this page is available as a live example / download example .
このページで扱っているコードについてはlive example / download exampleを通して利用可能です。
Modules

Angular apps are modular and Angular has its own modularity system called Angular modules or NgModules.
Angularアプリはmodularであり、AngularはAngular modulesまたはNgModulesと呼ばれる独自のmodularシステムを持っています。
Angular modules are a big deal. This page introduces modules; the Angular modules page covers them in depth.
Angular modulesは大掛かりです。このページではmoduleについて紹介し、詳細についてはAngular modulesのページでカバーします。
Every Angular app has at least one Angular module class, the root module, conventionally named AppModule.
すべてのAngularアプリは少なくとも1つのAngular module classを持ちます。それはroot moduleであり、慣習的にAppModuleと名付けられます。
While the root module may be the only module in a small application, most apps have many more feature modules, each a cohesive block of code dedicated to an application domain, a workflow, or a closely related set of capabilities.
root moduleは、規模の小さいアプリケーションにおいては唯一のmoduleとなるかもしれませんが、ほとんどのアプリは他に多くのfeature moduleを持っています。feature moduleはそれぞれアプリケーションドメイン、ワークフロー、または密接に関連した機能のセットに特化したコードのまとまったブロックです。
An Angular module, whether a root or feature, is a class with an @NgModule decorator.
Angular moduleは、rootだろうがfeatureだろうが、@NgModule decoratorを持ったclassです。
Decorators are functions that modify JavaScript classes. Angular has many decorators that attach metadata to classes so that it knows what those classes mean and how they should work. Learn more about decorators on the web.
Decoratorは、JavaScriptのclassを修正する関数です。Angularはmetadataをclassに結びつける多くのdecoratorを持っています。そのため、それぞれのclassが何を意味しているか、どのように動くべきか知ることができます。Webを通してdecoratorについてもっと調べてみましょう。
NgModule is a decorator function that takes a single metadata object whose properties describe the module. The most important properties are:
・declarations – the view classes that belong to this module. Angular has three kinds of view classes: components, directives, and pipes.
・exports – the subset of declarations that should be visible and usable in the component templates of other modules.
・imports – other modules whose exported classes are needed by component templates declared in this module.
・providers – creators of services that this module contributes to the global collection of services; they become accessible in all parts of the app.
・bootstrap – the main application view, called the root component, that hosts all other app views. Only the root module should set this bootstrap property.
NgModuleは、moduleを記述するプロパティを持つ1つのmetadataオブジェクトを取るdecorator functionです。特に重要なプロパティは以下の通りです。
declarations – このmoduleに属するview classをセットします。Angularはcomponent、directive、pipeの3種類のview classを持ちます。
exports – 他のmoduleのcomponentのtemplateから見えて利用できるこのmoduleのdeclarationsの一部をセットします。
imports – このmodule内で宣言されたcomponentのtemplateで必要とするclassをexportしている別のmoduleをセットします。
providers – providerはserviceを作成するものであり、このmoduleによってserviceのグローバルコレクション (injector)に登録するserviceをセットします。serviceはアプリのすべての箇所で利用可能になります。
- bootstrap – アプリのすべてのviewをホストするroot componentと呼ばれるメインアプリケーションのview classをセットします。root moduleだけがこのbootstrapプロパティをセットするようにします。
Here’s a simple root module:
以下はシンプルなroot moduleの例です。
import { NgModule }      from '@angular/core';
import { BrowserModule } from '@angular/platform-browser';
@NgModule({
  imports:      [ BrowserModule ],
  providers:    [ Logger ],
  declarations: [ AppComponent ],
  exports:      [ AppComponent ],
  bootstrap:    [ AppComponent ]
})
export class AppModule { }
The export of AppComponent is just to show how to export; it isn’t actually necessary in this example. A root module has no reason to export anything because other components don’t need to import the root module.
AppComponentのexportはどのようにexportするかを示しています(この例では実際には必要ないですが)。root moduleは何もexportする必要はありません。なぜなら、他のcomponentはroot moduleをimportする必要がないからです。
Launch an application by bootstrapping its root module. During development you’re likely to bootstrap the AppModule in a main.ts file like this one.
このroot moduleをbootstrappingすることでアプリケーションをローンチしましょう。開発中は、以下のようにmain.tsファイルの中でAppModuleをbootstrapすることになるでしょう。
import { platformBrowserDynamic } from '@angular/platform-browser-dynamic';
import { AppModule } from './app/app.module';

platformBrowserDynamic().bootstrapModule(AppModule);
Angular modules vs. JavaScript modules
The Angular module — a class decorated with @NgModule — is a fundamental feature of Angular.
Angular moduleは、@NgModuleでデコレートされたclassであり、Angularの基本的な機能です。
JavaScript also has its own module system for managing collections of JavaScript objects. It’s completely different and unrelated to the Angular module system.
JavaScriptもまたJavaScriptのobject群を管理するための独自のmoduleシステムを持っています。これはAngularのmoduleシステムとは完全に異なり、関連もしていません。
In JavaScript each file is a module and all objects defined in the file belong to that module. The module declares some objects to be public by marking them with the export key word. Other JavaScript modules use import statements to access public objects from other modules.
JavaScriptにおいて、各fileはmoduleであり、moduleに属するファイルの中で定義された全てのobjectです。moduleはobjectを作るときにexport キーワードを使うことでpublicとなるように宣言します。JavaScriptのmoduleはimport文を使って、他のmoduleのpublicなobjectにアクセスします。
import { NgModule }     from '@angular/core';
import { AppComponent } from './app.component';
export class AppModule { }
Learn more about the JavaScript module system on the web.
These are two different and complementary module systems. Use them both to write your apps.
これらの2つのmoduleシステムは別のものでありますが、互いに補足し合うようになっています。アプリを書く際は両方のmoduleを使うことになります。
Angular libraries

Angular ships as a collection of JavaScript modules. You can think of them as library modules.
AngularはJavaScriptのmoduleのコレクションを積んだ船のようなものです。それらはlibrary moduleとして考えることができます。
Each Angular library name begins with the @angular prefix.
Angular libraryの名前は@angular接頭辞で始まります。
You install them with the npm package manager and import parts of them with JavaScript import statements.
Angular libraryは、npmを使ってインストールし、JavaScriptのimport文を使ってそれらの要素をimportします。
For example, import Angular’s Component decorator from the @angular/core library like this:
例えば、@angular/core libraryからComponent decoratorをimportする時は以下のように書きます。
import { Component } from '@angular/core';You also import Angular modules from Angular libraries using JavaScript import statements:
同様にJavaScriptのimport文を使ってAngular libraryからAngular moduleをimportします。
import { BrowserModule } from '@angular/platform-browser';In the example of the simple root module above, the application module needs material from within that BrowserModule. To access that material, add it to the @NgModule metadata imports like this.
上記のシンプルなroot moduleの例において、アプリケーションのmoduleはBrowserModule内部のマテリアルを必要とします。そのマテリアルにアクセスするために、以下のように@NgModuleのmetadataのimportsに追加します。
imports: [ BrowserModule ],In this way you’re using both the Angular and JavaScript module systems together.
このような方法で、AngularのmoduleシステムとJavaScriptのmoduleシステムを一緒に使用します。
It’s easy to confuse the two systems because they share the common vocabulary of “imports” and “exports”. Hang in there. The confusion yields to clarity with time and experience.
どちらのシステムも”imports”と”exports”という共通の言葉を共有しており、2つのシステムは混同しやすいので、くじけないようにしましょう。時間と経験によりその混乱は明快なものとなります。
Learn more from the Angular modules page.
詳細はAngular moduleページをご参照ください。
Components

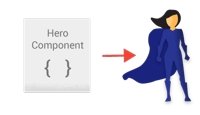
A component controls a patch of screen called a view.
componentはviewと呼ばれるスクリーンのパッチをコントロールします。
For example, the following views are controlled by components:
・The app root with the navigation links.
・The list of heroes.
・The hero editor.
例えば、以下のviewはcomponentによってコントロールされます。
- ナビゲーションのリンクを持ったアプリのroot
- ヒーローのリスト
- ヒーローのエディター
You define a component’s application logic—what it does to support the view—inside a class. The class interacts with the view through an API of properties and methods.
viewをサポートするcomponentのアプリケーションロジックはclassの内部に定義します。classはプロパティとメソッドのAPIを介してviewとやりとりします。
For example, this HeroListComponent has a heroes property that returns an array of heroes that it acquires from a service. HeroListComponent also has a selectHero() method that sets a selectedHero property when the user clicks to choose a hero from that list.
例えば、以下のHeroListComponentはheroesプロパティを持っています。heroesプロパティは、serviceから取得したヒーローの配列を返します。HeroListComponentはまたselectHero()メソッドを持っています。selectHero()メソッドは、ユーザーがリストからヒーローを選択するためにクリックした時に、selectedHeroプロパティをセットします。
export class HeroListComponent implements OnInit {
  heroes: Hero[];
  selectedHero: Hero;

  constructor(private service: HeroService) { }

  ngOnInit() {
    this.heroes = this.service.getHeroes();
  }

  selectHero(hero: Hero) { this.selectedHero = hero; }
}
Angular creates, updates, and destroys components as the user moves through the application. Your app can take action at each moment in this lifecycle through optional lifecycle hooks, like ngOnInit() declared above.
Angularはユーザーのアプリケーションでの操作を通してcomponentを作成し、更新し、破棄します。上記で宣言したngOnInit()のようなオプションのlifecycle hooksを通して、componentのライフサイクルの各段階でactionを起こすことが可能です。
Templates

You define a component’s view with its companion template. A template is a form of HTML that tells Angular how to render the component.
componentのviewは対となるtemplateを使って定義します。templateはcomponentをどのようにレンダリングするかAngularに伝えるHTMLです。
A template looks like regular HTML, except for a few differences. Here is a template for our HeroListComponent:
templateは通常のHTMLのように見えますが、いくつかの違いがあります。以下はHeroListComponentのtemplateです。
<h2>Hero List</h2>

<p><i>Pick a hero from the list</i></p>
<ul>
  <li *ngFor="let hero of heroes" (click)="selectHero(hero)">
    {{hero.name}}
  </li>
</ul>

<hero-detail *ngIf="selectedHero" [hero]="selectedHero"></hero-detail>
Although this template uses typical HTML elements like <h2> and <p>, it also has some differences. Code like *ngFor, {{hero.name}}, (click), [hero], and <hero-detail> uses Angular’s template syntax.
上記のtemplateは<h2>や<p>など典型的なHTMLの要素を使っていますが、同時にいくつか異なるものを使用しています。*ngFor、{{hero.name}}、(click)、[hero]、<hero-detail>などのコードをAngularのtemplateの構文として使用しています。
In the last line of the template, the <hero-detail> tag is a custom element that represents a new component, HeroDetailComponent.
templateの最後の行にある<hero-detail>タグは新しいcomponentであるHeroDetailComponentを表示するカスタムエレメントです。
The HeroDetailComponent is a different component than the HeroListComponent you’ve been reviewing. The HeroDetailComponent (code not shown) presents facts about a particular hero, the hero that the user selects from the list presented by the HeroListComponent. The HeroDetailComponent is a child of the HeroListComponent.
HeroDetailComponentはこれまで見てきたHeroListComponentとは異なるcomponentです。HeroDetailComponent(ここではコードの表示はありませんが)は、HeroListComponentに表示されているリストからユーザーが選択した特定のヒーローについての情報を表示するためのcomponentです。HeroDetailComponentはHeroListComponentのchild(子component)です。

Notice how <hero-detail> rests comfortably among native HTML elements. Custom components mix seamlessly with native HTML in the same layouts.
<hero-detail>がネイティブのHTML要素の中でいかに違和感なく収まっているか注目してください。カスタムcomponentは同じレイアウトの中でネイティブなHTMLとシームレスに区別なく使われています。
Metadata

Metadata tells Angular how to process a class.
MetadataはAngularにclassの処理方法を伝えます。
Looking back at the code for HeroListComponent, you can see that it’s just a class. There is no evidence of a framework, no “Angular” in it at all.
HeroListComponentのコードをもう一度見直してみると、まさにclassであることがわかるでしょう。そこにフレームワークの形跡、”Angular”は全くありません。
In fact, HeroListComponent really is just a class. It’s not a component until you tell Angular about it.
実際のところ、HeroListComponentは本当にclassでしかありません。Angularにcomponentであると伝えるまでcomonentではないのです。
To tell Angular that HeroListComponent is a component, attach metadata to the class.
HeroListComponentがcomponentであるとAngularに伝えるために、classにmetadataを付与します。
In TypeScript, you attach metadata by using a decorator. Here’s some metadata for HeroListComponent:
TypeScriptにおいては、decoratorを使ってmetadataを付与します。以下はHeroListComponentに付与するmetadataです。
@Component({
  selector:    'hero-list',
  templateUrl: './hero-list.component.html',
  providers:  [ HeroService ]
})
export class HeroListComponent implements OnInit {
/* . . . */
}
Here is the @Component decorator, which identifies the class immediately below it as a component class.
この@Component decoratorは、直ちに真下にあるclassをcomponent classとして識別します。
The @Component decorator takes a required configuration object with the information Angular needs to create and present the component and its view.
@Component decoratorは、componentとそのviewを作成し、表示するためにAngularが必要とする情報を伴う必須の設定オブジェクトを受け取ります。
以下は@Componentでよく使われる設定オプションです。 selector: componentのインスタンスを作成し挿入する際に、親HTMLの中で<hero-list>タグがどこにあるか探せるように、Angularに伝えるCSSのselectorです。例えば、アプリのHTMLが<hero-list></hero-list>を含んでいた場合、AngularはHeroListComponentのviewのインスタンスをそれらのタグの間に挿入します。 templateUrl: 先述したcomponentのHTML templateの相対アドレス(module-relative address)です。 providers: componentが必要とするserviceのためのdependency injection (DI) providerの配列です。表示するヒーローリストを取得できるようにするためにcomponentのconstructorがHeroServiceを必要とすることをAngularに伝えるひとつの方法です。 @Componentのmetadataは、componentのために指定した主要な構成要素(building block)をどこで取得するかAngularに伝えます。 template、metadata、componentは一緒にviewを記述します。 Angularの挙動をコントロールするために別のmetadataのdecoratorを同様の方法で適用してみましょう。@Injectable、@Input、@Outputはよりポピュラーなdecoratorです。 アーキテクチャー上の覚えておくべき点は、Angularが何をしなければいけないか知るためにmetadataをコードに追加しなくてはいけないということです。 フレームワークがないと、データの値のHTMLへの出力や、ユーザーによるアクションや値の更新へのレスポンスの受け取りに対して自分で責任を負わなければなりません。このような読むのにつまらなく、ミスを起こしやすく、悪夢のようなpush/pullのロジックを一から書くことは、経験豊富なjQueryプログラマーが正解だと証明するようなものです。 Angularはdata binding(templateの一部とcomponentの一部を結合するメカニズム)をサポートします。binding用のマークアップをtemplateのHTMLに追加することで、Angularにtemplateとcomponentの両方をどう結合するか伝えます。 上記の画像の通り、data bindingの構文は4種類あります。それぞれ至DOM(to the DOM)、自DOM(from the DOM)、またはその両方といったように「方向」を持っています。 HeroListComponentの例では、templateは3つのdata bindingを持っています。 {{hero.name}} interpolation(補間)は<li>要素の中にcomponentのhero.nameプロパティの値を表示します。 [hero] property bindingは親コンポーネントのHeroListComponentからselectedHeroの値を子コンポーネントのHeroDetailComponentのheroプロパティに渡します。 (click) event bindingはユーザーがcomponentのヒーローの名前をクリックした際にselectHeroメソッドを呼び出します。 双方向データバインディングは重要な4つ目のdata bindingで、ngModel directiveを使って、1つの表記でpropertyとevent bindingを結びつけます。以下はHeroDetailComponentのtemplateの例です。 双方向バインディングにおいて、データプロパティの値はproperty bindingと同様にcomponentからinputボックスに流れます。またユーザーが値を変更すると、event bindingと同様に、プロパティは最新の値にリセットされ、逆にcomponentに流されます。 Angularはアプリケーションのcomponentツリーのroot componentからすべての子componentまで、JavaScriptのeventサイクルごとに1回すべてのdeta bindingを処理します。 Data bindingはtemplateとそのcomponent間のコミュニケーションにおいて重要な役割を果たします。 Data bindingはまた、親componentと子component間のコミュニケーションにとっても重要です。 Angularのtemplateは動的です。Angularがtemplateをレンダリングした時、directiveによって受け取った命令に従ってtemplateをDOMに変換します。 directiveは@Directive decoratorを持ったclassです。componentは「templateを持ったdirective」です。つまり、@Component decoratorは実際はtemplate指向の機能で拡張された@Directive decoratorです。 componentは技術的にはdirectiveですが、componentはAngularアプリケーションにとって特徴的であり中心となるものであるため、このアーキテクチャー概要ではdirectiveからcomponentを切り離しています。 directiveには他にstructural directiveとattribute directiveの2つが存在します。 これらは属性と同じように、名前だったり、しばしば割り当て先やbinding先のターゲットとして要素タグ内に見られることが多いです。 Structural directiveはDOMの要素を追加したり、削除したり、置換したりすることによってレイアウトを変更します。 例のtemplateでは以下のように2つのビルトインstructural directiveを使用しています。 Attribute directiveは現在の要素の表示や振る舞いを変更します。templateにおいて、Attribute directiveはその名前の由来のように通常のHTMLの属性のように見えます。 双方向data bindingを実装するngModel directiveはattribute directiveの良い例です。ngModelは、表示されている値をプロパティにセットし、changeイベントに反応することによって現在の要素(主に<input>)の振る舞いを変更します。 Angularはレイアウト構造を変更したり(例えばngSwitch)、DOM要素とcomponentの見た目を変更したりする(例えばngStyleや ngClass)directiveを他にもいくつか持っています。 もちろん、独自のdirectiveを書くことも可能です。HeroListComponentのようなcomponentはカスタムdirectiveの一種です。 serviceは、アプリケーションに必要な値や関数、機能を含む幅広いカテゴリです。 ほとんどどんなものもserviceになりえます。serviceは一般的に狭く限られた明確な目的を持ったclassです。serviceは何かを具体的にし、良くしてくれるでしょう。 例えば以下のようなものが含まれます。 serviceについてAngularは特に何も関与しません。Angularはserviceの定義を持ちません。serviceをベースにしたclassはなく、serviceを登録する場所もありません。 それにも関わらず、serviceはAngularアプリケーションにとって重要なものです。componentはserviceをよく使います。 以下はブラウザのコンソールにログを出力するservice classの例です。 以下はPromiseを使用してヒーローをfetchするHeroServiceです。HeroServiceはLogger serviceともう1つのserviceであるサーバー通信の単調な仕事を処理するBackendServiceに依存しています。 Serviceは至る所にあります。 したがって、component classは小さく作るべきです。componentはサーバーからデーターをfetchしませんし、ユーザーのinputをvalidateしませんし、ログを直接consoleに出力しません。そのようなタスクはserviceに任せるようにします。 componentの役割はユーザーエクスペリエンス(UX)を可能にすることであり、それ以上何もありません。componentは(templateによってレダリングされた)viewと(しばしばmodelの概念を含んでいる)アプリケーションロジックの間を取り次ぎます。良いcomponentはdata bindingのためにプロパティとメソッドを提供します。些細でないものはすべてserviceに任せるようにします。 もちろん、Angularはこれらの原則を強制しません。もし3,000行もする”kitchen sink” componentを書きたければ文句は言いません。 しかし、Angularは、アプリケーションのロジックをserviceに組み込み、それらのserviceをdependency injection(依存性注入)を通してcomponentが利用できるのを容易にしてくれることによって、これらの原則に従うのを助長してくれます。 dependency injection(依存性注入)はclassの新しいインスタンスに必要とする完全に形成された依存関係を提供する方法です。ほとんどの依存関係はserviceにあります。Angularは新しいcomponentに必要なserviceを提供するためにdependency injectionを使います。 Angularはコンストラクタのパラメータの型を見ることでcomponentがどのserviceを必要とするのか指示を出すことができます。例えば、HeroListComponentのコンストラクタはHeroServiceを必要としています。 Angularがcomponentを作成する時、Angularはまずcomponentが必要なserviceをinjectorに尋ねます。 injectorは前に作られたserviceのインスタンスのコンテナーを保持しています。もしリクエストされたserviceのインスタンスがコンテナーに含まれていなかったら、injectorはserviceのインスタンスを作り、serviceがAngularに返される前にコンテナーに追加します。すべてのリクエストされたserviceが解決され、returnされた時に、Angularは引数としてそれらのserviceを持ったcomponentのコンストラクターを呼び出すようになります。これがdependency injectionです。 HeroServiceのinjectionのプロセスはざっくりですが以下のようになります。 もしinjectorがHeroServiceを持っていなかったら、それをどのように作るかをどのようにして知ればよいでしょうか。 簡単に言うと、事前にHeroServiceのproviderをinjectorに登録しておく必要があります。providerはservice(一般的にservice classそのもの)を作成したり、returnしたりできるものです。 providerはmoduleまたはcomponentに登録することができます。 通常、同じserviceのインスタンスならどこでも利用できるようにroot moduleにproviderを追加します。 あるいは、@Component metadataのprovidersプロパティに、componentレベルで登録します。 componentレベルでの登録とは、componentの新しいインスタンスごとにserviceの新しいインスタンスを取得するということを意味します。 dependency injectionについて覚えておくべきポイントは以下の通りです。 dependency injectionはAngularフレームワークに最初から備わっているもので、どこでも使える injectorは主要な仕組みである providerはserviceを作るためのレシピである providerをinjectorに登録しよう Angularアプリケーションの8つの主な構成要素についての基礎を学んできました。 これらはAngularアプリケーション全般における基礎であり、これだけでも十分に開発を進めることができます。しかし、これがすべてではありません。 以下に他に重要なAngularの機能やserviceをアルファベット順に簡単ではありますが、紹介します。これらのほとんどはAngularのドキュメントでカバーされています(または今後カバーされます)。 Animations: 深いアニメーション技術やCSSの知識がなくても、Angularのanimation libraryを使うことでAnimate componentが動作するようになります。 Change detection(変更検知): Change detectionのドキュメントでは、画面がアップデートされた時に、componentのプロパティの値が変わったということをAngularがどのように判断するのか、そして非同期アクティビティを横取りし、change detection strategiesを走らすためにAngularがどのようにゾーンを使用するのか説明する予定です。 Events: Eventsのドキュメントでは、eventの発行/購読メカニズムを使ってeventを発生させるためにどのようにcomponentやserviceを使用するのか説明する予定です。 Forms: HTMLベースのバリデーションとdirty checkingで複雑なデータ入力の下書きをサポートします。 HTTP: HTTPクライアントを使ってデーターを取得したり、データーを保存したり、サーバーサイドのアクションを呼び出したりするためにサーバーとの通信を行います。 Lifecycle hooks: lifecycle hookインターフェースを実装することによって、componentの作成から破棄までのライフサイクルにkeyとなる瞬間を打ち込みます。 Pipes: templateのpipeを使用すると、値を表示用に変換することができ、ユーザーエクスペリエンス(UX)の改善につながります。以下のcurrency pipe式について見てみましょう。 これにより42.33という価格の表記は$42.33として表示されます。 Router: ブラウザから去ることなくクライアントアプリケーション内でページからページへのナビゲートを実現します。 Testing: Angular Testing Platformを使ってAngularフレームワークとやり取りする際に、アプリケーションのそれぞれのパーツのユニットテストを実行します。 自分もまだAngularをちゃんと把握できていない部分もあるので、意訳ができず意味がわかりにくい部分もあったかと思いますが、英語による原文も一緒に載せているので、そちらも合わせてご確認ください。 Angularは、静的型付け、decorator、DI(Dependency Injection)などJavaScriptではこれまであまり馴染みのなかった概念が持ち込まれています。ただ、今回日本語に訳したこのArchitecture Overviewを何度も繰り返し読むことで、それを含めAngularの仕組みをしっかり理解できるようになると思います。 まずはAngularの概要を掴んで、それからチュートリアルに挑んだり、各機能を細かく勉強していくと良いかと思います。 最後にAngularの書籍を紹介しておきます。Angularのバージョン4にも対応しており、さらにバージョン5を見据えた内容になっています。ぜひこちらも参考にしてみてください。Here are a few of the most useful @Component configuration options:
・selector: CSS selector that tells Angular to create and insert an instance of this component where it finds a <hero-list> tag in parent HTML. For example, if an app’s HTML contains <hero-list></hero-list>, then Angular inserts an instance of the HeroListComponent view between those tags.
・templateUrl: module-relative address of this component’s HTML template, shown above.
・providers: array of dependency injection providers for services that the component requires. This is one way to tell Angular that the component’s constructor requires a HeroService so it can get the list of heroes to display.

The metadata in the @Component tells Angular where to get the major building blocks you specify for the component.
The template, metadata, and component together describe a view.
Apply other metadata decorators in a similar fashion to guide Angular behavior. @Injectable, @Input, and @Output are a few of the more popular decorators.
The architectural takeaway is that you must add metadata to your code so that Angular knows what to do.
Data binding
Without a framework, you would be responsible for pushing data values into the HTML controls and turning user responses into actions and value updates. Writing such push/pull logic by hand is tedious, error-prone, and a nightmare to read as any experienced jQuery programmer can attest.

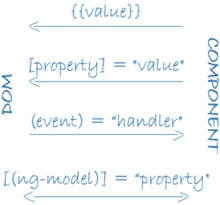
Angular supports data binding, a mechanism for coordinating parts of a template with parts of a component. Add binding markup to the template HTML to tell Angular how to connect both sides.
As the diagram shows, there are four forms of data binding syntax. Each form has a direction — to the DOM, from the DOM, or in both directions.
The HeroListComponent example template has three forms:
<li>{{hero.name}}</li>
<hero-detail [hero]="selectedHero"></hero-detail>
<li (click)="selectHero(hero)"></li>
・The {{hero.name}} interpolation displays the component’s hero.name property value within the <li> element.
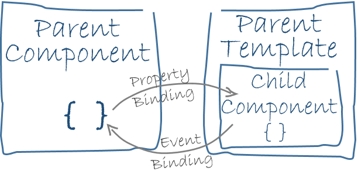
・The [hero] property binding passes the value of selectedHero from the parent HeroListComponent to the hero property of the child HeroDetailComponent.
・The (click) event binding calls the component’s selectHero method when the user clicks a hero’s name.Two-way data binding is an important fourth form that combines property and event binding in a single notation, using the ngModel directive. Here’s an example from the HeroDetailComponent template:
<input [(ngModel)]="hero.name">In two-way binding, a data property value flows to the input box from the component as with property binding. The user’s changes also flow back to the component, resetting the property to the latest value, as with event binding.
Angular processes all data bindings once per JavaScript event cycle, from the root of the application component tree through all child components.

Data binding plays an important role in communication between a template and its component.

Data binding is also important for communication between parent and child components.
Directives

Angular templates are dynamic. When Angular renders them, it transforms the DOM according to the instructions given by directives.
A directive is a class with a @Directive decorator. A component is a directive-with-a-template; a @Component decorator is actually a @Directive decorator extended with template-oriented features.
While a component is technically a directive, components are so distinctive and central to Angular applications that this architectural overview separates components from directives.
Two other kinds of directives exist: structural and attribute directives.
They tend to appear within an element tag as attributes do, sometimes by name but more often as the target of an assignment or a binding.
Structural directives alter layout by adding, removing, and replacing elements in DOM.
The example template uses two built-in structural directives:
<li *ngFor="let hero of heroes"></li>
<hero-detail *ngIf="selectedHero"></hero-detail>
・*ngFor tells Angular to stamp out one <li> per hero in the heroes list.
・*ngIf includes the HeroDetail component only if a selected hero exists.Attribute directives alter the appearance or behavior of an existing element. In templates they look like regular HTML attributes, hence the name.
The ngModel directive, which implements two-way data binding, is an example of an attribute directive. ngModel modifies the behavior of an existing element (typically an <input>) by setting its display value property and responding to change events.
<input [(ngModel)]="hero.name">Angular has a few more directives that either alter the layout structure (for example, ngSwitch) or modify aspects of DOM elements and components (for example, ngStyle and ngClass).
Of course, you can also write your own directives. Components such as HeroListComponent are one kind of custom directive.
Services

Service is a broad category encompassing any value, function, or feature that your application needs.
Almost anything can be a service. A service is typically a class with a narrow, well-defined purpose. It should do something specific and do it well.
Examples include:
There is nothing specifically Angular about services. Angular has no definition of a service. There is no service base class, and no place to register a service.
Yet services are fundamental to any Angular application. Components are big consumers of services.
Here’s an example of a service class that logs to the browser console:
export class Logger {
  log(msg: any)   { console.log(msg); }
  error(msg: any) { console.error(msg); }
  warn(msg: any)  { console.warn(msg); }
}
Here’s a HeroService that uses a Promise to fetch heroes. The HeroService depends on the Logger service and another BackendService that handles the server communication grunt work.
export class HeroService {
  private heroes: Hero[] = [];

  constructor(
    private backend: BackendService,
    private logger: Logger) { }

  getHeroes() {
    this.backend.getAll(Hero).then( (heroes: Hero[]) => {
      this.logger.log(`Fetched ${heroes.length} heroes.`);
      this.heroes.push(...heroes); // fill cache
    });
    return this.heroes;
  }
}
Services are everywhere.
Component classes should be lean. They don’t fetch data from the server, validate user input, or log directly to the console. They delegate such tasks to services.
A component’s job is to enable the user experience and nothing more. It mediates between the view (rendered by the template) and the application logic (which often includes some notion of a model). A good component presents properties and methods for data binding. It delegates everything nontrivial to services.
Angular doesn’t enforce these principles. It won’t complain if you write a “kitchen sink” component with 3000 lines.
Angular does help you follow these principles by making it easy to factor your application logic into services and make those services available to components through dependency injection.
Dependency injection

Dependency injection is a way to supply a new instance of a class with the fully-formed dependencies it requires. Most dependencies are services. Angular uses dependency injection to provide new components with the services they need.
Angular can tell which services a component needs by looking at the types of its constructor parameters. For example, the constructor of your HeroListComponent needs a HeroService:
constructor(private service: HeroService) { }When Angular creates a component, it first asks an injector for the services that the component requires.
An injector maintains a container of service instances that it has previously created. If a requested service instance is not in the container, the injector makes one and adds it to the container before returning the service to Angular. When all requested services have been resolved and returned, Angular can call the component’s constructor with those services as arguments. This is dependency injection.
The process of HeroService injection looks a bit like this:

If the injector doesn’t have a HeroService, how does it know how to make one?
In brief, you must have previously registered a provider of the HeroService with the injector. A provider is something that can create or return a service, typically the service class itself.
You can register providers in modules or in components.
In general, add providers to the root module so that the same instance of a service is available everywhere.
providers: [
  BackendService,
  HeroService,
  Logger
],
Alternatively, register at a component level in the providers property of the @Component metadata:
@Component({
  selector:    'hero-list',
  templateUrl: './hero-list.component.html',
  providers:  [ HeroService ]
})
Registering at a component level means you get a new instance of the service with each new instance of that component.
Points to remember about dependency injection:
・Dependency injection is wired into the Angular framework and used everywhere.
・The injector is the main mechanism.
・An injector maintains a container of service instances that it created.
・An injector can create a new service instance from a provider.
・A provider is a recipe for creating a service.
・Register providers with injectors.Wrap up
You’ve learned the basics about the eight main building blocks of an Angular application:
That’s a foundation for everything else in an Angular application, and it’s more than enough to get going. But it doesn’t include everything you need to know.
Here is a brief, alphabetical list of other important Angular features and services. Most of them are covered in this documentation (or soon will be).
Animations: Animate component behavior without deep knowledge of animation techniques or CSS with Angular’s animation library.
Change detection: The change detection documentation will cover how Angular decides that a component property value has changed, when to update the screen, and how it uses zones to intercept asynchronous activity and run its change detection strategies.
Events: The events documentation will cover how to use components and services to raise events with mechanisms for publishing and subscribing to events.
Forms: Support complex data entry scenarios with HTML-based validation and dirty checking.
HTTP: Communicate with a server to get data, save data, and invoke server-side actions with an HTTP client.
Lifecycle hooks: Tap into key moments in the lifetime of a component, from its creation to its destruction, by implementing the lifecycle hook interfaces.
Pipes: Use pipes in your templates to improve the user experience by transforming values for display. Consider this currency pipe expression:
price | currency:'USD':trueIt displays a price of 42.33 as $42.33.
Router: Navigate from page to page within the client application and never leave the browser.
Testing: Run unit tests on your application parts as they interact with the Angular framework using the Angular Testing Platform.
まとめ


コメント